12/11/13

Ginger Orange Beets

I find that people seem to be intimidated by beets. They don't know how to prepare them or think they are just for juicing! Here is a super simple recipe made with beautiful Chiogga Beets (they kind of remind me of candy canes).

Ginger Orange Beets

2 large Beets sliced into 1/4 inch slices
1 Tbs Oil (coconut or safflower)
2 tbs of Orange Juice
Pinch of ground Ginger 

Preheat oven to 425 degrees. Toss beets in oil and place on cookie sheet. Bake for 15 minutes, turn over and bake additional 10 minutes. Toss hot beets in orange juice and ginger. Serve. Easy peasy!


12/8/13

Butternut Squash and Kale Lasagne

1 large Butternut Squash 
1C Heavy Cream
1/2 Tsp Nutmeg 
1 Tbs Sunflower oil
1 yellow Onion
1 clove Garlic
1 bunch Kale
1/2 tsp Sage
2 C shredded Cheese ( I used 1 C each smoked gouda and mild cheddar)
9 sheets of Lasagne Noodles

Preheat oven to 450. Cut large butternut squash in half and clean out seeds. Place squash on cookie sheet and bake 45 minutes or until soft and slightly browned.

In a large skillet over medium heat sauté onion with 1 tbs oil,
stirring frequently till golden brown. 

Get large pot of water boiling for noodles.

While onions are cooking peel roasted squash and place chunks into food processor
with cream and nutmeg, process until smooth.

When onions are brown add in garlic, kale and sage. Cook until greens are wilted and bright green ( remember they will continue to cook in the oven).

When greens are done and squash purée is made drop noodles in pot 3 at a time and boil for 3 minutes (you just want noodles pliable, but not soft).

In a 9x13 pan place a spoonful of squash purée and spread on bottom of pan. Place  cooked noodles along bottom of pan, top with 1/3 remaining squash purée, 1/2 of kale mixture and 1/3 of cheese.
Repeat on the next layer and finish lasagne with a layer of noodles, remaining squash purée and cheese.
Reduce oven temp to 350. Bake lasagne for 30 minutes, until cheese is melted and lasagne is heated through. 
(I forgot to take a picture if finished product...we were hungry!)

12/5/13

Grown Up Grilled Cheese #1


We recently started carrying raw milk and cheese from Meadow Wayne Dairy at our store and they have been sampling all kinds of yummy cheese. With the weather turning cold and lots of cheese on hand I had to make grilled cheese. I always have to put my spin on things so here is one of my recipes for Grown Up Grilled Cheese.

Smoked Mozzarella with Apples and Almond Butter (Sounds crazy, tastes delectable)
Serves 1

2 Slices any whole grain bread
2 tbs natural unsalted almond butter
1/2 apple-sliced
2 oz (about) sliced smoked mozzarella cheese
Butter or Butter it Up Spray

In a small skillet over medium low heat cook apple until soft, set aside. Butter or spray outside of bread.Spread 1 tablespoon almond butter on inside of each piece of bread, top with cheese and then apple. 

Place both pieces if bread butter side down on skillet over medium low heat. Put lid in pan to help melt the cheese, set timer for 2 minutes. Put both halves of sandwich together and cook additional 2 minutes each side or until melted and nicely browned.


11/26/13

Easy as Pie Crust

I love to bake, but I have always hated to make pie crust. I can make angel food cakes, homemade breads, cheeses and even wedding cakes, but I hated to make pie crust! A few years back I came across a recipe where you make pie crust using a food processor, eureka! No more cutting in chilled butter with a fork or pastry blender ( I swear I had one once, I think I lost it when we moved 10 years ago). This recipe is so easy anyone can do it, I swear! I made my pie crusts tonight for Thanksgiving. It's a great time saver to make them up in advance. They keep well in the fridge for a few days or the freezer for a month.

Makes 2 single crusts or 1 double crust pie

2 sticks cold butter
2 1/2 C Whole Wheat Pastry Flour 
1/4 tsp sea salt
1/4 C ice water, optional


In a food processor mix flour and salt.
Then turn food processor on and add butter a few cubes at a time.
Do not over mix the flour and butter or your crust will be tough. At this point you may want to add in ice water if your mix looks dry and isn't coming together. This mix came together without it.
If your flour is really fresh like mine was ( or its really humid) the flour will have a lot of moisture in it and will stick together when you pinch it.
Throw a little flour down on your counter.
Dump out contents of food processor.
Work dough with floured hands and divide into two portions and make into rounds.

 Chill at least 30 minutes and up to 5 days or freeze for a month. Use for your favorite pie or our Agave sweetend Butter Pecan Pie!

Macaroni ala Madden


Now that Madden is getting older I am constantly trying to figure out what to feed him! I need to keep things soft and small, but I also want to make things that we can have for dinner too. I don't have time to make 2 dinners! I grew up eating Macaroni and Cheese out of the blue box. I am embarrassed to say I turned my nose up at my Grandmas homemade Mac and Cheese. Those little boxes of Mac and cheese sure can be convenient but they are loaded with garbage and I want better for my boy. 
Homemade Mac and Cheese is easier than it sounds and makes a huge pot for just a few dollars. I add veggies to everything and this dish is no exception. 

Makes 6 Servings
1 small zucchini diced
2 C broccoli florets Chopped
1 tbs butter
3 C shredded cheese (1 C Gouda and 2 C Cheddar)
4 tbs butter
1/4 c flour
2 1/2 C whole milk
1 tsp mustard powder (not prepared mustard!)
1/4 tsp onion powder
Fresh ground black pepper to taste
2 C dry elbow macaroni

In a large pot boil macaroni according to package directions. Meanwhile sauté zucchini and broccoli in 1 tbs butter until vegetables are soft.
I cut the veggies very small and cook until very soft to make it easy for Madden to eat.
In large pot the macaroni was boiled in melt 4 tbs butter.
Pour flour into butter and cook until flour is golden brown.
Slowly mix in milk, making a thick gravy.
Stir in mustard powder, onion powder and pepper
then shredded cheese. 
Lastly mix in vegetables and macaroni. 

11/23/13

Company Mashed Potatoes


When we make mashed potatoes for ourselves we prefer the more rustic skin on mashed potatoes, but these mashed potatoes are what we make when we have company. I like to use Yukon Gold Potatoes for mashed potatoes because they don’t take on as much water as russets when you boil them, so you end up with a creamier consistency. The addition of cream cheese not only adds flavor but prevents the mashed potatoes from getting too gummy (do not over beat your mashed potatoes, that can make them gummy too) and they reheat beautifully the next day for leftovers. You can also make these 3 hours in advance and keep them warm in a crockpot.
Serves 10
5 pounds Yukon Gold Potatoes
1 Stick Unsalted Butter- cut into chunks
1 package (8 Oz.) Cream Cheese, Softened
1/2 to 1 Cup Whole Milk
1 tsp Sea Salt

Instructions
Peel and cut the potatoes into pieces that are generally the same size. Bring a large pot of water to a simmer and add the potatoes. Bring to a boil and cook for 30 to 35 minutes. When they’re cooked through, the fork should easily slide into the potatoes with no resistance, and the potatoes should almost, but not totally, fall apart.
Turn off stove.

Drain the potatoes in a large colander. When the potatoes have finished draining, place them back into the dry pot and put the pot on the stove. Mash the potatoes on hot burner, allowing all the steam to escape, before adding in the other ingredients.


Add butter and cream cheese into potatoes, then stir in 1/2 C Milk.
When I am doing a large batch I like to use my stand mixer, but you can use a hand mixer or an old fashion potato masher.

Depending on consistency, add more milk and add in sea salt. Taste to see if its to your liking. I always taste to make sure the seasonings are correct. If you used salted butter you won't need as much salt, if you use unsalted you may need more. Keep in mind how salty the gravy will be as well. If you are serving these with a brined turkey you may not want to put as much salt in the potatoes!


11/21/13

Mashed Sweet Potatoes with Bourbon & Molasses

One of my favorite Thanksgiving tricks is to make mashed potatoes a couple of hours before dinner because it seems like there is so much to do right at the end. Your making gravy getting all the dishes together, carving turkey and getting everyone round the table. So I keep my mashed potatoes warm in the crock-pot. These will keep on warm for 3-4 hours and if they start to dry out add a little orange juice. Just be careful not to stir then too often or they get starchy.

Makes 4-6 Servings

6 small yams about 3 lbs scrubbed and patted dry
4 Tbs unsalted butter
3 Tbs Rapadura (unrefined) sugar
3 Tbs unsulfured molasses
3 Tbs bourbon
Salt & pepper to taste
1/8 tsp allspice
1/8 tsp nutmeg
(I have used orange juice in place of bourbon for people who do not wish to have alcohol or to thin if mixture is especially thick)

Preheat oven to 400°. Prick each yam several times with a fork. Place yams on a cookie sheet and bake until tender when pierced with a small knife, about 45 minutes.
Cut yams in half lengthwise and scoop flesh into large saucepan and discard skins. Add butter, sugar, molasses, bourbon salt, pepper, allspice and nutmeg. Mash until smooth. Re-warm yams over low heat stirring often, about 5 minutes. Transfer yams to bowl and serve at once.

Yams can be baked ahead and assembled just before meal.


11/20/13

Nothing Canned, Green Bean Casserole

If you never had green bean casserole made with fresh ingredients you are missing out. I had always made and grown up with the recipe on the back of the soup can but as I got conscious of ingredients I realized those onion things were terrible! This recipe I have slightly adapted from Alton Brown's Recipe on the Food Network site. I made some changes for our Gluten Free Friends and added some tips to make turkey day easier!

Serves 6-8

Ingredients

For the topping: (I like to make these 1 day in advance)

2 medium yellow onions, thinly sliced
1/4 cup all-purpose flour (or gluten free flour)
1/4 C bread crumbs (or gluten free bread crumbs- just take a pieces of gluten free bread, break into pieces and pulse in the food processor)
1 teaspoon kosher salt
1 egg
Nonstick cooking spray- we use Spectrum Organics

For beans and sauce:

2 tablespoons plus 1 teaspoon kosher salt, divided
1 pound fresh green beans, rinsed, trimmed and halved
2 tablespoons unsalted butter
12 ounces mushrooms, trimmed and cut into 1/2-inch pieces
1/2 teaspoon freshly ground black pepper
2 cloves garlic, minced
1/4 teaspoon freshly ground nutmeg
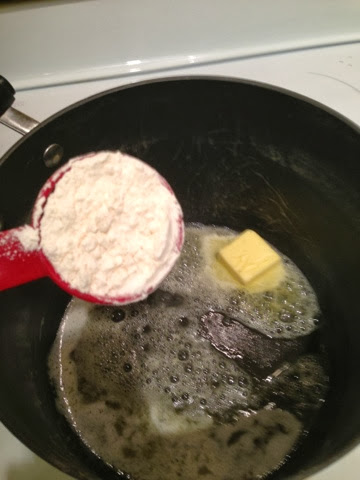
2 tablespoons all-purpose flour (or gluten free flour)
1 cup chicken broth
1 cup half-and-half

Directions

Preheat the oven to 475 degrees F.

Coat a sheet pan with nonstick cooking spray. Place bread crumbs in a plastic bag. Beat egg in a small bowl. Combine the onions, flour, and salt in a bowl. Dip onions in egg. Shake egg coated onions in bread crumbs then evenly spread the onions on the pan. Spray the top of onions with a little cooking spray. Place the pan on the middle rack of the oven and bake until golden brown, approximately 30 minutes (keep a close eye to prevent burning). Toss the onions 2 to 3 times during cooking. Once done, remove from the oven and set aside until ready to use. *If prepared the day before let cool and seal in tupperware, try not to eat too many*

Turn the oven down to 400 degrees F.

While the onions are cooking, prepare the beans (this can also be done the day before). Bring a gallon of water and 2 tablespoons of salt to a boil in an 8-quart saucepan. Add the beans and blanch for 5 minutes. Drain in a colander and immediately plunge the beans into a large bowl of ice water to stop the cooking. Drain and set aside.

Melt the butter in a 12-inch skillet set over medium-high heat. Add the mushrooms, 1 teaspoon salt and pepper and cook, stirring occasionally, until the mushrooms begin to give up some of their liquid, approximately 4 to 5 minutes. Add the garlic and nutmeg and continue to cook for another 1 to 2 minutes. Sprinkle the flour over the mixture and stir to combine. Cook for 1 minute. Add the broth and simmer for 1 minute. Decrease the heat to medium-low and add the half-and-half. Cook until the mixture thickens, stirring occasionally, approximately 6 to 8 minutes.

Remove from the heat and stir in 1/4 of the onions and all of the green beans. Pour mixture into buttered 9x13 pan. Top with the remaining onions. Place into the oven and bake until bubbly, approximately 15 minutes. Remove and serve immediately.

***You could certainly make all the components a day ahead and combine the green beans, mushroom sauce and all but 1/4 of the onions in a buttered casserole dish cold. Bake at 400 degrees for 30 minutes then top with remaining onions and bake for 15 minutes and serve.***

11/14/13

Citrus Rosemary Grilled Turkey

My oven is usually maxed out on Thanksgiving and when you have 30 people coming to dinner one turkey is not going to cut it, so what do you do? Utilize the Grill! Grilling a whole turkey is easier than it sounds. Not only does the Turkey cook more quickly using this method, but it tastes awesome.

Ingredients:
1/4 cup fresh rosemary leaves
6-8 cloves garlic, roughly chopped
zest of one orange
zest of one lemon
2 tablespoons fresh thyme
1 tablespoon orange or lemon juice
1 tablespoon extra virgin olive oil
1 teaspoon salt
1 teaspoon black pepper
10-12 lb turkey
Preparation:
Place all ingredients, except turkey, in food processor container and process until blended.


This rub has more of a paste consistency. If not using right away, place in airtight container and refrigerate.


Next cut the backbone out of the Turkey with a pair of kitchen scissors. Pick a side to start on and insert kitchen scissors and cut along side of the backbone. Repeat on other side.


Flip turkey over and place on a cookie sheet. Press firmly on the breast bone of the turkey and break it so the Turkey lies flat.

Next gently loosen skin over the turkey breast by slipping your hand under the skin and wiggle your hand to free the skin, taking care not to tear it (take off rings before doing this).

Take about one third of Citrus Rosemary Rub and spread it under the skin. Take the remainder of rub and cover the the outside of turkey.

Preheat grill to Medium heat. Place turkey on a cookie sheet onto grill. Grill turkey for about 25 minutes per pound (a 10lb Turkey should take about 2 1/2 hours) If it is especially cold out it WILL take longer, if its over 70 it will cook more quickly. I usually check it half way through to check the progress. The absolute most important thing to remember is not to open the grill more than once or twice. You are turning your grill into an oven, so if you open it up you will lose the heat and lengthen the cooking process. (I once threatened to break a guests arm if they opened my grill one more time, dinner was delayed over an hour, grr!)

Turkey is done once a thermometer inserted into the thigh reached 180 or once the leg is loose in the joint, I like to say when you can shake the Turkeys “hand” its done.
Let it rest under foil for 30 minutes to redistribute the juices before carving.

11/11/13

Agave Sweetened Butter Pecan Pie


We have cleaned up the ingredients of this Butter Pecan Pie by removing the corn syrup and replacing it with agave nectar. Before you go all crazy on me by telling me that Agave Nectar is just as bad as corn syrup let me get in two points.
1. Yes Agave Nectar is Fructose (that’s why it works in this and my peanut brittle recipe to be shared in December) but depending on HOW it’s processed it can be lower glycemic
2. Agave Nectar is Non-GMO and doesn’t contain all the icky stuff used to process corn syrup.
Why do you need a fructose component in pecan pie?
If you ever made Rock Candy as a child you know that sugar molecules fight through liquid to bond to each other. When they push out liquid they stick to each other and crystallize. Fructose butts in between the sugar molecules to keep them apart, preventing crystallization. So here we use Agave Nectar as the fructose to keep the sugar from crystallizing.

Say bye-bye to runny pecan pie!
If you ever have had runny pecan pie, or burnt your crust trying to get your filling set up, here is the secret. Cook the filling first! By pre-cooking the filling, your pie crust and filling will finish together is glorious harmony.


Agave Sweetened Butter Pecan Pie

1 pie crust (try our Easy as Pie Crust!)
1 ½ cups Pecans (halves and pieces) plus 1 ½ C pecan halves for top
1 cup Rapadura sugar
1 cup Agave nectar
1/2 cup unsalted Butter
1 tablespoon All-Purpose Flour
1/2 teaspoon Sea Salt
3 Eggs, lightly beaten
1 teaspoon Vanilla

To prepare the filling: Preheat the oven to 425°. Combine the pecans, rapadura sugar, agave nectar, butter, flour and salt in a heavy-bottomed pan over medium heat. Bring to a boil, stirring constantly. Remove from heat. Cool 15 minutes.

Whisk the eggs and vanilla into the filling. Pour the filling into the pie shell. Place reserved pecan halves on top.

Bake 10 minutes. Reduce the oven temperature to 325°. Bake until the custard has set and a knife inserted in the center comes out cleanly, about 45 minutes. Transfer to a rack and cool for at least 45 minutes.

Chocolate Bourbon Pecan Pie Variation 

Make as above but replace flour with 3 Tbs Cocoa powder and add 3 Tbs Bourbon in with egg and vanilla. Bake same as above. 

This was a huge hit at Thanksgiving. By using cocoa powder instead of chocolate chips like other recipes you have chocolate throughout the pie instead of glopy chocolate at the bottom of the pie and the cocoa powder cuts the sweetness of the pecan pie a bit!

* for 2014 I used Cognac instead of Bourbon and omitted the vanilla, I think it was even better!


10/31/13

Devilishly Good Chocolate Cookies


When I was a kid Halloween was my favorite Holiday behind Christmas (it still is). I loved wandering the neighborhood collecting treats and the anticipation of wondering what would pop out and scare me at any moment. One thing I could count on every year was my last stop on my way home. There was a little old lady a few streets over that set up a buffet table out in front of her house with a crockpot full of hot apple cider and the rest of the table was lined in homemade cupcakes. We would always stop weary from a night of some tricks, collecting treats and have a cup of her hot apple cider and a cupcake. We would be sure to eat it on our way home because we had been warned against the evils of homemade treats and we knew our parents would take it away. The woman had lived their for years, and she made the best cupcakes, we figured if she was out to poison children on Halloween she wouldn’t be set up in front of her house year after year.


In recent years we have searched for treats to give out for Halloween that we felt good about, and we will NOT be the house that gives out boxes of raisins! I won’t go into all the reasons that we do not hand out regular candy (if you want to know more check this out) but one is its really expensive. So this year we are bringing back homemade treats. We have labeled our cookies with our store information and attached the link to this page. We have made these cookies with ingredients we feel good about and hopefully you feel good about giving to your children too!

Happy Halloween,

BJ, Christine and Madden


Devilishly Good Chocolate Cookies

Makes about 3 dozen


1 C. Butter
2/3 C. Evaporated Cane Sugar
2/3 C. Rapadura Sugar
2 Eggs
1 tsp. Vanilla
2 Tbs. Water
2 C. Whole Wheat Pastry Flour
1/2 C. Cocoa Powder
1 tsp. Baking Soda
3/4 tsp. Cinnamon
2 C. Chocolate Chips

Instructions:


Pre-Heat Oven to 375 degrees. Line cookie sheet with parchment paper.Cream together butter & sugar, add eggs one at a time beating after each addition, beat in vanilla.
 In a separate bowl stir together dry ingredients. 
Add dry ingredients into wet then add water. Beat until combined. Stir in chocolate chips. 
 Scoop rounded tablespoons of batter onto cookie sheet. 

Bake for 12 minutes, remove from cookie sheet and cool on wire rack.


All ingredients are organic or Non GMO Project Verified.

10/29/13

Pumpkin Crumble Bars


This recipe falls under” the healthier because I made it” category. This time of year I am on a quest for all things pumpkin and am tempted by the pumpkin-flavored-everything commercials. I like knowing that if I am going to indulge that I am eating quality ingredients. I also love the way my house smells when I bake, its better than any $10 candle (and tastier too). These bars have a soft pumpkin pie filling surrounded by a crunchy, crumbly crust.

Pumpkin Crumble Bars

For the Crust & Crumble
3 C. Rolled Oats
1 3/4 C Whole Wheat Pastry Flour
1 1/2 C Rapadura Sugar
1/2 tsp baking soda
1 C plus 2 Tbs Unsalted Butter- Softened
1 C. Chopped Pecans or Walnuts- optional
(after I made these BJ told me, "You know what would make these even better? Nuts.")

For Filling
15 oz of Pumpkin Puree
3 eggs
3/4 C Heavy Cream
1/2 C Rapadura Sugar
1 tsp Pumpkin Pie Spice
(or 1/2 tsp cinnamon, 1/4 tsp ginger, 1/4 tsp nutmeg and 1/8 tsp cloves)
1 tsp vanilla


Preheat oven to 375. Line a 13x9 pan with parchment paper, set aside. In a large bowl mix together crust ingredients with your hands (if you have a little one have them help you with this) until it resembles pebbles.


Pull out 2 cups of Crumble mixture, set aside. Press remaining Crumble Mixture into bottom of pan, bake for 10 minutes.

(He thinks he’s helping!)

While that’s baking, in a large bowl mix together pumpkin, eggs, cream, sugar, spices and vanilla. Pour over baked crust. Return to oven for 15 minutes.

When pumpkin layer is somewhat set,

sprinkle remaining crumble over top. Return to oven and bake 20 additional minutes.


You can either cool and cut into bars or hover over it fresh out of the oven and eat it by the spoonful! Also would be good with fresh whipped cream (isn’t everything).